Ferrari 250 Testa Rossa - 1958 - WIP
 1November 14, 2012So it begins...
 2November 14, 2012Assembling the body, sanding it smooth and put it in primer.
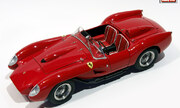
 3November 24, 2012After the primer has dried, I applied a first coat of flat acryl red, then 3 wet coats of TS-08 Italian Red.
 4November 24, 2012Obviously, the body still needs to be polished, but the glossy base is already there.
 5November 24, 2012It's hard to see at the picture, but the bonnet was already polished to try out the procedure.
 6November 24, 2012After the polishing I will have to decide if a gloss clear coat is still nessecairy...
 7November 24, 2012I would like to achieve making a picture of my model looking just the way the reference picture of Ralph Lauren's car looks...
 8November 20, 2013I finally started to build the engine, showing why exactly this car was called 'Testa Rossa' which means 'Red Head'...
 9November 20, 2013I added the wiring and the red guiding tubes through which the wires are running. I also ordered aluminium turned intakes, but they haven't arrived yet...
 10November 20, 2013The big 12-cilinder 3 liter engine takes up quite a bit of space in the chassis.
 11November 20, 2013No brake discs here in 1958, this Ferrari was stopped through drum brakes 😉
 12November 24, 2013I continued the build, assembling the rear suspension and the frame.
 13November 24, 2013Hasegawa did a pretty good job simulating the tubular frame chassis.
 14November 24, 2013The engine compartment is not complete yet; a few hoses and wires still need to be added.
 15November 24, 2013The bottom of the car is complete; I think I will give it a light drybrushing.
 16November 24, 2013I didn't add any details to the underside since it won't be visible anyway...
 17November 24, 2013I replaced the kit wire wheels by aftermarket rims by Hobby Design. Each wheel consists of 11 parts (of which 8 PE parts).
 18November 24, 2013With the wheels in place, the chassis looks a lot more like a car...
 19November 24, 2013The wire wheels really give the model a realistic look; compared to the kit wheels they enhance the model 100%.
 20November 24, 2013The cockpit still needs a lot of details before I can fix the body to the chassis.
 21November 24, 2013Here you can see part of the battery which was located in the cockpit interior.
 22November 30, 2013I added some extra details to the engine bay and I painted the seats.
 23November 30, 2013Seats were given several coats with different shades of red to enhance the depth effect.
 24November 30, 2013Once the red seats were looking good, I sprayed them with a protective flat coat.
 25November 30, 2013Next I could mask the white stitches and spraypaint them as well.
 26November 30, 2013Close-up of the engine bay. Nearly finished now. Intake trumpets still missing though.
 27December 15, 2013In the meantime I managed to repair the damaged paintjob. Next I fixed the decals and I sprayed a gloss coat.
 28December 15, 2013Next I painted the complete body interior semi gloss black.
 29December 15, 2013I also added some of the details like the headlights, the instrument panel and the radiator (not visible here).
 30December 15, 2013Finally I gave the panel lines a black wash and I when this was done I polished the complete body once more.
 31December 15, 2013The body was put aside and the final detail work was done at the chassis.
 32December 15, 2013The last wiring was fixed in place, and the only missing parts under the bonnet are the intake trumpets which are still in backorder...
 33December 15, 2013I fixed the gear lever and the hand brake in place.
 34December 15, 2013The fuse box was installed as well.
 35December 15, 2013Now the chassis and the body are both ready to be joined together.
 36December 15, 2013Here is the last picture before the 'wedding ceremony'...
 37December 15, 2013And here we are, the chassis and body have been joined together.
 38December 15, 2013It was a bit tricky to pull the body over the chassis, since it needed to be widened a little and I was afraid to damage it, but it all went well.
 39December 15, 2013The engine looks great under the open bonnet.
 40December 15, 2013Of course, it will look even greater once the intake trumpets will be installed.
 41December 15, 2013But for now, this will have to do.
 42December 15, 2013Dryfit of the bonnet.
 43December 15, 2013I will probably show the car with open bonnet, but it looks ok with closed bonnet as well.
 44December 15, 2013Another view of the car form the rear.
 45December 15, 2013Now I can start applying the detail trim on the Ferrari.
 46December 15, 2013First thing on the to do list: installing the exhausts...
 47December 19, 2013So that is what I did: fixing the exhausts.
 48December 19, 2013Next I attached the model to a firm acryl base, allowing me to continue the build without having to touch the car very often.
 49December 19, 2013Fixing the external trim is very important and tricky: you can ruin your model in the final phase of the build easily...
 50December 19, 2013The most tricky part will be fixing the windscreen without damaging the paintjob.
 51December 19, 2013But first things first: I assembled the steering wheel, cutting away the plastic centre and replacing it by PE. I also assembled the tiny ignition key (compare to a normal push pin)...
 52December 19, 2013This is the spot where the ignition key will have to be fixed. As it is quite prominent it's important to make an interesting key with keyhanger 😉
 53December 19, 2013Close-up of the dashboard and gear lever.
 54December 19, 2013Close-up of the radiator protection mesh.
 55December 19, 2013Close-up of the engine bay. Still no intake trumpets 🙁


Opmerkingen
23 May 2025, 20:10 -