

The Black Knight of Berlin (Me262)

I've been waiting to crack open this box for a while...

The sprues are quite a bit different from the Academy Me262.

Ok, since this is going to be wheels up with a pilot in the seat and the canopy closed, it's pretty easy to get started.

Interior painted with Tamiya XF-22 (RLM Gray), the engines get a coat of XF-16 Aluminium and XF-84 Dark Iron.

Now to close up the wheel wells. First off, need to separate the covers.

Fit relatively well, but will need to cover a few gaps it seems.

Painted parts ready to be assembled.

Now for some engine LEDs... because... of course I’m going to do that. It’s my style!

Fit is pretty good, but still needs some sanding on the seams.

Closed up the wheel wells. The fit’s a bit touchy, because it’s not an OOB option. Surgery required.

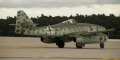
There he is... the Black Knight of Berlin himself!

Not quite ready for takeoff... some putty required.

Canopy fits well. Ready for some masking.

Undercoat of Tamiya XF-1 Flat Black shows off the spots that still need a bit more love and attention.

Oh, the Tamia X-18 Semi-Gloss Black was just the right choice. A happy medium.

Of course a coat of Future basically makes it into full gloss. But at least I know the difference!

Hmmm... really not pleased with the Testors enamel. First time to try them... didn't do the job I was hoping for. No matter what I do, I can't seem to get rid of that white haze.

New technique. Crushed chalk applied with water. Survey says...

Hmm... not bad, but I suspect the panel lines are a bit too full of paint/future/paint/future to allow for a very even distribution.


Let's go back to the drawing board. Those amazing decals really should sit on better plastic, no?


Let's start with some of the main bits.

Luckily I can just re-use the LED lights. Much easier to drill holes for them as well.

Everything painted up and ready for assembly.

It's been a while, so let's test those lights again!

I much prefer the raised cockpit details... and I think Herbert von Richter does too!

Just about ready for takeoff... again!

A few seams patched up and we're ready for the canopy, masking and some paint.

I went with Tamiya X-1 this time... the coat of Future means it doesn't really matter. The Future was a bit thicker than I would've liked, but there's no turning back now!

Yeah. Mission accomplished. The Tamiya X-2 White enamel was just what the panel lines ordered.

Yeah... that's what I'm talking about!


Comments
28 April 2024, 22:02 -
Project info


Group Build
Scalemates Schwalbe Group build 2021
1. January until 31. December 2021
1. January until 31. December 2021