

Williams FW13B Renault - GP Hungary 1990 - WIP
 1September 14, 2016To (re)-build this Williams FW13B I ordered a set of Zero Paints colors at Hiroboy to get the correct matching colors. After some masking and spray painting this is the result.
 2September 14, 2016I also ordered a set of Shunko replacement decals because the set in my kit was ruined. Here the first clear coat is applied in order to get a better result fixing the red and white striping.
 3September 14, 2016Next I fixed all the sponsor decals to the monocoque.
 4September 14, 2016The rear cowling received the same treatment of course.
 5September 14, 2016Finally the front and rear spoilers were decalled, as well as the nose part. I added an extra spoiler to the rear wing because this model represents the Hungarian GP which Boutsen won.
 6September 14, 2016Dryfit of the decalled parts. Now a second clearcoat will follow. Note the extra spoiler at the rear wing bottom.
 7September 25, 2016While the clearcoated bodyparts are drying, I started to assemble the engine and the rear suspension. I also added a nut to the chassis, enabling me to attach the car to a base plate later on.
 8September 25, 2016I didn't add any extra's to the engine or suspension, because the Williams will be showed as a "curbside" model, with all bodyparts closed.
 9September 25, 2016I did however paint all the parts following the instructions, because the gearbox will be partly visible even with the bodyparts closed. And it will always be possible to look into the engine compartment from behind, so a minimum of colours are advisable.
 10September 25, 2016Next I concentrated to the cockpit, which will of course be visible at all times since this is a single seater. I started by sanding off the injected seat belts and I replaced them by real ones (made by Studio27).
 11September 25, 2016The lower seat belts were installed to the cockpit hub. The little control panel to the driver's left was painted without knowing how it looks in reality. The only reference pic I could find showed the absence of a control panel...
 12September 25, 2016When the cockpit hub and the seat are joined, the completed seat belt construction becomes visible.
 13September 25, 2016"When details are visible, make sure everything is as detailed as possible"... So the steering wheel was carefully painted and even the white stitching was applied.
 14September 25, 2016The dash board was detailed as well; I added some text and other markings.
 15September 25, 2016The gear lever was painted as well, the main thing being the wooden shift knob.
 16September 25, 2016Dry fiit of the cockpit to the chassis. The nut is well situated behind the seat, and the bolt will be able to sit freely behind the cockpit.
 17September 25, 2016Dry fit of the front body part.
 18September 25, 2016And dry fit of all the bodyparts, however I didn't click them into place yet.
 19September 28, 2016Now it's time to do some useless work: painting and decalling the sidepods of the car. I shouldn't do them because they will be invisible anyway, but I just did it for the fun of it 😉
 20September 28, 2016The sidepod interior got the same treatment, although here it's a little less useless: they will be partly visible through the air intakes.
 21September 28, 2016I also painted the interiors of the bodywork. No need to remove the sink marks here since this will not be visible. The black is just there to make sure that the white plastic is nowhere visible.
 22September 28, 2016The rims and tires however are very visible, so they received the full detail treatment, even the valves were added.
 23September 28, 2016The cockpit was assembled as well.
 24September 28, 2016The steering wheel with the white stitches will be very visible because the cockpit of nineties racecars were very wide and low. Until Senna's crash, when they became a lot narrower and higher.
 25September 28, 2016The black parts of the front and rear wing were painted with semigloss varnish.
 26September 28, 2016After I fixed the brakes to the suspension, I could finally fix the wheels in place, enabling me to put the car on a baseplate.
 27September 28, 2016From this moment on I can start to add the last details to the car, such as the rearview mirrors and some electronic equipment.
 28September 28, 2016Too bad that all of this won't be visible anymore once the bodyparts are fixed in place... Oh well, we still have the pictures to check out how things were.
 29September 28, 2016One more picture of the open car before we close it up.
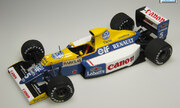
 30September 28, 2016In the mean time I added a lot of rivets to the bodyparts. I also added an antenna, which was absent in the kit. This concludes the build of the Williams. The pictures of the car with fixed bodyparts are in my 'finished model album'.


Comentarii
24 May 2025, 09:27 -
Project info
54 imagini

1:20
terminat

Williams FW13B
Williams F1 Team 5 (Thierry Boutsen)
1990 Formula1 season
Blue, Yellow, White