Lotus 49B Ford - GP Mexico 1968 - WIP
 1February 11, 2013This is a picture of the Lotus I want to build: this car won the Mexican GP of 1968 with Graham Hill behind the wheel. He became world champion that year.
 2February 11, 2013I espially like the very high rear spoilers of the period, which were absolutely new in 1968. So new that F1-designers didn't know what they were messing with, leading to a lot of crashes, resulting in a temporary ban of the rear spoilers...
 3February 11, 2013This Lotus 49B was appearantly designed by Vincenzo Bosica, a famous name in the world of 1/43 kits and models. I didn't know this until I started to build it.
 4February 11, 2013First up are the clean-up of the bodyparts. The nose of the Lotus will be detachable with lots of detail inside...
 5February 11, 2013Dry fit of the bodyparts.
 6February 11, 2013The white metal rims were cleaned and polished with a Dremel and steel wool.
 7February 11, 2013I didn't like the heavy rear spoiler struts, so I cut them away and I replaced them by scratched photoetched struts.
 8February 11, 2013The rear spoiler itself was polished because I don't intend to paint it. It will however receive some small black stripes; I will use decals for this job.
 9February 11, 2013I also found a 1:43 driver figure of Graham Hill; I would like to put this figure next to the finished model.
 10February 11, 2013This is what I have realized so far; a lot of cleaned up parts, ready for painting.
 11February 11, 2013And when I put all these parts together as a dry fit, it starts to look how I would like the end result to become...
 12February 16, 2013I removed the rivets which were out of scale, and then I sprayed the basic colors on the body. Now I can start decalling 😉
 13February 16, 2013The driver figure received some painting of the face and hands; the suit is only a base color.
 14February 16, 2013The helmet will receive the typical white 'oars', symbols of his London Rowing Club.
 15February 16, 2013After completion of the helmet, I can concentrate on the racesuit.
 16February 23, 2013The main bodyparts have received their decals, next I sprayed 2 clear coats (1k epoxy) to protect everything.
 17February 23, 2013Dry fit of the nose part; it needed some trimming to fit again because of the clear coats.
 18February 23, 2013The wheels and tires have been fixed as well; the wheel centres were painted in semigloss black and the tire decals were put in place. They were protected as well, with flat coat this time. Unfortunately the kit only has 4 'Firestone' decals...
 19February 23, 2013The 4 cm high driver figure was painted to completion. I added shadows to the race suit, the helmet was hand painted, and I added some sponsor decals which I also sealed with a flat coat.
 20February 23, 2013The red stripes on both sides of the suit were hand painted.
 21February 23, 2013The 8 white oars were cut from white decals sheet.
 22February 23, 2013I'm not sure of there were any sponsors at the back, I didn't find any picture showing this side of Graham Hill in 1968.
 23February 23, 2013And here we are again with the dry fit of the whole thing. This is how the model should look when it is finished. Graham Hill is already waiting, but unfortunately the car isn't finished yet 😉
 24February 23, 2013I added a small chin strap to the helmet to enhance the realism.
 25February 23, 2013I received a few pictures showing Hill's back from some of my good friends, so I added a 'Firestone' sponsor on Hill's back.
 26February 26, 2013The interior of the monocoque has been painted, now we can start to assemble the front suspension.
 27February 26, 2013These are all the white metal parts which will together form the front suspension, once completed.
 28March 3, 2013I decided not to use the steering shaft because it's overdimensioned. I used metal wire instead, as I did for some other parts.
 29March 3, 2013Here you see the application of the metal wire as a steering shaft, as well as the radiator supports which I replaced as well. The white metal cooling pipes have been replaced by scratched parts because they were too bent and impossible to straithen.
 30March 3, 2013I'm still not sure if the car will be presented open like this or with the nose part on top. The problem is not the level of detail, but the model has been designed the wrong way: the front spoiler should be attached to the car when the nose is detached.
 31March 5, 2013I made some progress, building parts inside the cockpit.
 32March 5, 2013The dashboard was upgraded with some spare dial decals, some wiring and a few switches.
 33March 5, 2013The steering shaft was replaced by a thinner specimen, and the gear lever was replaced as well.
 34March 5, 2013The kit roll bars were thrown away and replaced by scratched metal wire roll bars.
 35March 5, 2013Overview of the Lotus so far. Next up will be the engine.
 36March 7, 2013The basic engine parts have been assembled.
 37March 7, 2013The engine block and some of the suspension parts have been in basic colors.
 38March 7, 2013The white metal rear exhaust supports have been replaced by thin metal wire supports.
 39March 7, 2013Dry fit of the Lotus with wheels attached.
 40March 7, 2013And this is how it looks with the nose part in place.
 41March 7, 2013I continued working on the engine.
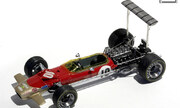
 42March 7, 2013The engine is as good as ready now.
 43March 7, 2013What I still have to do is fix the spark plug wiring, and add some weathering.
 44March 7, 2013When the engine will be finished I still have to fix the gigantic real spoiler, and the windscreen.


Коментарі
23 May 2025, 22:26 -