

AREA 88 : "A Close Shave"

That's a big fuselage for 1/144 scale. 🙂

That's just ONE of the wings...

There's the other wing. That's a huge base... which I won't be using, of course.

The tail... and the F-5E sprues look TINY in comparison.

A quick dry fit mock up. This is the ultimate David vs. Goliath project.

The engines could be better... so let's grab a few bombs and make them better.

Yeah. That looks much better to me.

Inside the wing wiring. Each wing has a white strobe light, a coloured (red/green) navigation light, and two landing lights. I used wire shrink wrap around the interior part of the LED to try to limit light bleed. Everything held neatly in place by a massive amount of hot glue.

All still fits inside. That's a good sign.

Same goes on the other side.

Now for the engines themselves. First some paint. I started this project partially because my main airbrush broke and I was waiting for a part, but for an interior splash of paint, my old (backup) airbrush will do.

Fans and exhausts fitted in place.

The engines look pretty good to me. Need some putty and sanding on the seams though.

Test fit on the wings... I count 8 working lights. So far, so good!

For the tail pieces, I'll solder on the resistors/wiring inside the fuselage instead of trying to cram it all inside that small space.

There we go. Using a toothpick, I added a few dabs of clear "5-minute epoxy" as a cover for all the lights. It should both protect the LEDs (and look more like a bulb) and diffuse the light a bit better. Now for some more sanding.

Now for the interior. First a coat of black to block the interior lights from shining through the plastic.

Testing the light brightness. I also added another coat of aluminium to reflect even more light.

Next a coat of aluminium to reflect even more light. Also cover the windows from the inside with 5 minute epoxy. I also epoxy-ed in some posts to hang the lights from so the spacing would be even.

All the Christmas lights hung from the chimney with care...

Everything looks good...

Also added some internal support for the main post. I don't need it getting broken inside the fuselage!

Testing the interior lights shining through the epoxy windows... looks good!

Now to test the interior AND the exterior lights.

To make it even more complicated, let's add the red fuselage lights to the mix.

Let's wire in the Arduino nano that will control all this mess of wires.

Ok.. don't forget the F-5E Tiger II! A good fit, but still needs some putty for the gaps.

Shin gets snug in the cockpit.

Ok. looking good. Canopy on, a million windows on the B747 masked... we're almost ready for some paint.

Big brother stopped by to compare paint jobs.

Looks good. Needs a bit of a panel wash and then we're ready for the decals.

Let's check those lights one more time...

Decals on... looks good.

Some masking and some painting happened. I won't bore you with the details, but it took a few tries.

The homemade decals on the B747 and the base look good... at least on THIS side. 😉


Коментарі
38 2 June 2022, 14:08
Thanks Roland. My airbrush broke a couple of days ago, so, while waiting for a new part to arrive, I decided to tackle a project that won't require any painting for a bit. 🙂
I've had this one on the books for a while, but the time just seemed right. Almost all my 1/144 scale Area 88 projects incorporate electronics (LEDs or DC motors), but this one will be lit up like a Christmas tree! I've already got 8 lights in the wings and two in the tail... more to come!
2 June 2022, 14:21
Finally got all the lights hooked up. Still need to mount the red beacons, but at least they all work.
6 June 2022, 13:44
Finally had time to move this project long. Some careful masking, and Shin's F-5E Tiger II is just about done. The B747-200 is still a ways away, but coming along.
23 July 2022, 04:38
Well well.well. great built so far. I'm always impressed while installation of lights in models. Well done!
23 July 2022, 08:39
I kinda missed taking some pictures… but just try to imagine me drowning in tape while masking the paint lines for the two-tone bare metal and the red cheat line… 😉
14 August 2022, 06:23
How could I miss this one! And there is an Arduino in the base, so there will be action!
14 August 2022, 08:04
I was a bit hesitant to go the arduino route. Compared to the complexity of the projects I usually deploy the arduino in, this one is pretty tame. But I wanted a bit more variation in the lighting, so… that was certainly the easiest thing to do.
14 August 2022, 14:11
This one was so big, I struggled to be able to get some half decent pics of the final build.
26 August 2022, 16:18
The pics might not quite do it justice, but hopefully the video does:
Youtube Video
26 August 2022, 17:09
Thanks guys. If anyone wants to read the manga pages this build is inspired from, feel free to check out my blog - strobez.ca/wp/index...-close-save-area-88/
26 August 2022, 20:30
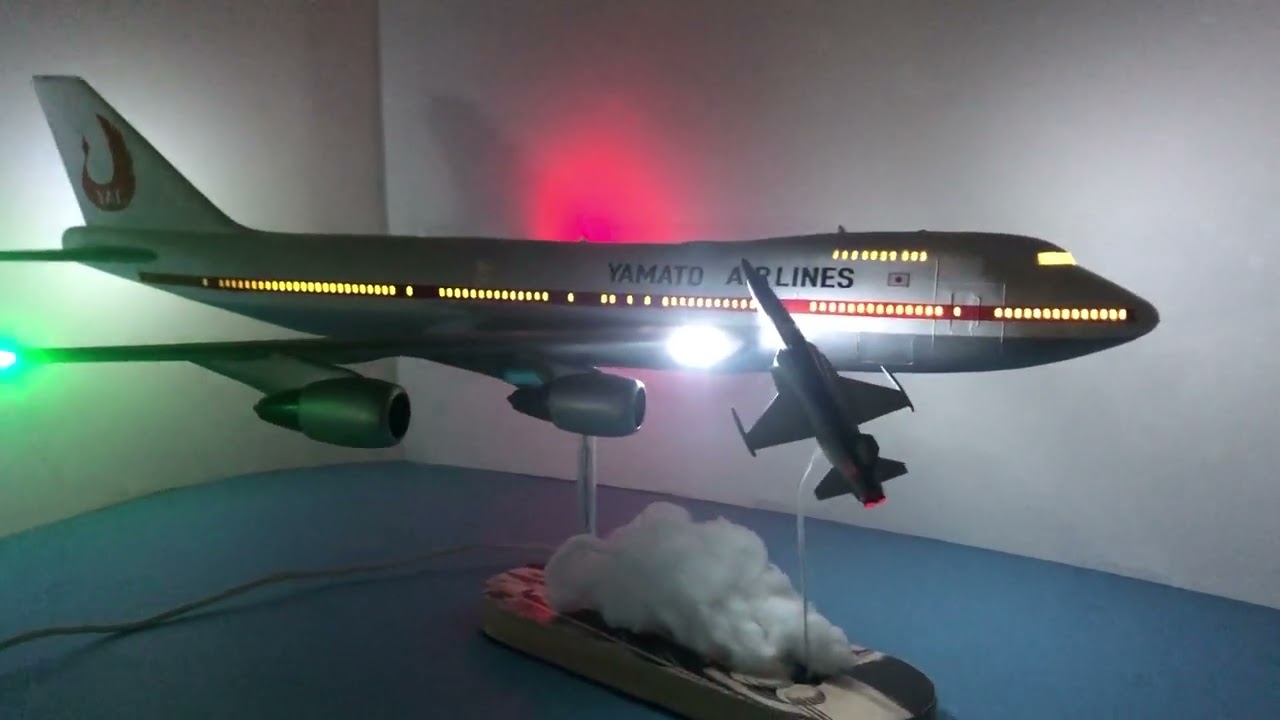
Nicely done and awesome lights with strobos 😃👍 I wonder is that small cotton cloud necessary? It is quite remote from the main models and covers the cool wooden stand.
28 August 2022, 10:31
Thanks guys. Yeah... I'm starting to have second thoughts on the cotton cloud as well. I might just remove it. It doesn't quite work as I was expecting... and I have another little build that will make better use of it I think. 😉
29 August 2022, 02:09
Album info
On Kanzaki's last flight before becoming a full-fledged Yamato Airlines pilot, he's forced to fly without the use of an auto-pilot. When the 747-200 he's piloting strays slightly off course, he learns the need to be ever alert after a near collision with his former friend Shin's F-5E Tiger II in a cloud bank over the Mediterranean.


